Applying for a Job
Applying for a job can be intimating (specially because it can be a lengthy process), but the main goal is to find something that will make you happy and feel rewarding at the same time.

Figure out what kind of job you want
Make a short list of jobs you'd be okay doing. Consider your time commitment (while some jobs might offer flexibility to students, others are very consistent on punctuality and attendance) and keep in mind the location (do you have reliable transportation? would your commute time allow you to enjoy the rest of your day?).
Time Commitment
Are you looking for a part-time (10-25 hrs usually), full-time (40 hrs a week), or seasonal (e.g. summer or winter)?
Industry
There are many industries in different sectors (for example Healthcare, Construction, Education, Hospitality, and Retail).
Location
What physical location would you like to work in? (in a store or venue, office, outdoors, online). How far are you willing to commute?
Build or Refresh your Resume
A resume is a summary of a person's education, qualifications and previous experience. It is extremely helpful for employers to compare job applicants, that is why it is very important for you to create a personalized resume that stands out from the rest. A resume is organized in various sections (see examples below), use your criteria to decide which sections to include.
Resume Tips:
-
Be consistent in the format and content (use the same number of bullet points in each section, capitalize all of your sentences, and use consistent spacing).
-
Keep your resume to 1 page (one-sided)
-
Proofread for typos and misspellings
-
Use an easy-to-read font and 10-14 point size
-
Organize each section in chronological order
-
Use bullet points, underline, and bold to organize your sections
-
Avoid using "I" (it is implied throughout the document) and use a variety of action verbs to highlight your experience. For instance, instead of saying "I was in charge of arranging bookshelves in alphabetical order," say something like, "Organized bookshelves in alphabetical order".
-
Do not abbreviate (not every reader will be familiar with industry jargon).
-
If you are submitting your resume online, send it as a .pdf file (this will keep the format you intended). Title your .pdf file with your name to make it easier to spot!
-
Research the company and the job description. Look at the key terms they use and include them in your resume.

Contact Information
Include your full name, phone, a professional e-mail address, home address (only City and zip code) and other pertinent websites/accounts (e.g. LinkedIn, e-portfolio).
Work Experience
List paid & volunteer work in reverse chronological order. List responsibilities, results, leadership, teamwork, and initiative using action verbs. Include the organization name, your title, and dates of employment.
Objective
It is a brief summary of what you want to accomplish. Be specific as to what particular job or career field you want to get into. An objective lets potential employers know your main goal.
Extracurricular Activities
Write these sentences using the "work experience" guides. List community service projects you have participated on, sports, student organizations, church groups, etc.
Summary
It is a brief paragraph highlighting your qualifications for the job you are applying. These include your skills, strengths, and experience. Located at the top of your resume.
Skills
Focus on the skills specific to the job you are applying for. Include whether you have foreign language skills, computer software knowledge (name specific programs). Other training or certification.
Education
Only include high school and above. Write your school's name and City and your (anticipated) graduation date. Indicate whether you had study abroad experience, and if you took coursework or projects that would serve you in the job position. Only include GPA if it is 3.0 or above.
Awards
Add scholarships, academic awards, honor societies, certificates or recognitions.
There are many good examples that can provide insightful information and tips on how to draft your resume and cover letter:
It is okay to have one resume that you can modify but never turn in the same resume to multiple companies/jobs. Make sure that every resume that you turn in is tailored to the position you are applying to.
Create a Cover Letter
Generally, a cover letter should accompany each resume. Some companies require it, and for others, it is optional.
The cover letter allows you to demonstrate your ability to write and offers the first statement of why you should be hired. It can also be a tool to explain in more detail something that you didn't cover in your resume.
Cover Letter Tips:
-
Use the same letterhead that you use for your resume (Including your contact information)
-
If possible, address a specific person (add his or her title, the company name, and the company address).
-
Tailor your letter (highlight strengths, job skills, traits and past work experience that are relevant to the position and meet the employer's needs).
-
Date and sign the letter

Opening Paragraph
State that you are applying for a specific position and how you learned about it. Personalize the letter by saying why you want to work for this organization.
Middle Paragraph(s)
Outline the qualifications that make you a strong candidate and relate them to the needs of the job opening. Specific examples demonstrate your skills & experiences.
Closing Paragraph
Discuss your next action step. Repeat your interest in the position and indicate when you will contact the employer to follow up. Thank the employer for reviewing your resume.
Before the Job Interview:
Don't worry, everyone gets nervous on a job interview! The more you practice and prepare, the easier it will be for you.
Learn About The Company
Know what the company does by looking at the organization's website, annual reports, and asking current employees. Research the industry and the job position (be ready to explain why you want this job, even if it’s “to learn” or “to gain experience”).
Bring The Basics
Bring extra copies of your resume (if you have one), a pen and paper, photo ID (if asked), business card, portfolio, etc.
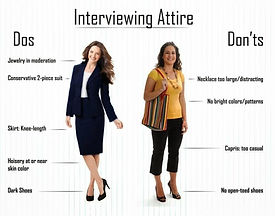
Plan your Outfit
Dress professionally (clean, neat, and appropriate). It is better to be slightly overdressed than underdressed. Avoid ripped clothes, flip-flops, or distracting graphics.

Practice Interview Questions
Practice out loud with a friend, parent, or mirror. Look up more sample questions on the internet.
-
Tell me about yourself
-
Why do you want to work here?
-
What are your strengths and weaknesses?
-
Why did you choose to major in _______?
-
What are your career ambitions?
-
What motivates you?
-
Why should we hire you?
-
How do you handle stress?
-
Tell me about a time when you were part of a great team.
-
What was your part in making the team effective?
-
How would you describe yourself using three words?
-
Could you share a recent accomplishment of which you are most proud?
-
How do you deal with a difficult customer?
-
Tell me about a time when you dealt with a difficult co-worker
During the Job Interview:
Be honest with your responses and finish strong (even if the interview was not what you expected, make a final good impression)!
Be on Time
Be on time (or early!). If it is an in-person interview, aim to arrive 15 minutes early (not sooner). If it’s virtual, test your tech beforehand.
Turn off or silence your cellphone.
Greet your Interviewer
Properly address the interviewer by calling him/her "Mr. ____" or "Ms.____". Use a firm handshake to convey confidence and enthusiasm.
Watch your Body Language
Smile, make eye contact and
sit up straight. Avoid playing with your hands, pens, legs, etc.
Answer The Questions You Are Asked
Do not deviate too much from the topic. If you didn't hear a question correctly, you can ask the interviewer to repeat it. When answering each question, consider describing the context, explaining the action you took to handle the situation, and the result(s).
Even if you don’t have work experience, employers value reliability (“I show up on time”), teamwork ("I am part of sports, clubs, group projects, etc."), and responsibility (school, volunteering, babysitting, helping at home). It’s okay to say you’re new and eager to learn. Don’t pretend to know things you don’t.
Ask Questions And Take Notes
Employers like to see that you have an interest in the company, and it could give you an advantage! Here are some sample questions you can ask:
-
What does a typical day look like?
-
What makes someone successful in this job?
-
What do you like most about your job?
-
What are some of the challenges that you face in your job?
-
What training is offered for this job?
-
Are there opportunities to advance?
-
Can you tell me more about the culture of the company?
-
When can I hear a decision from you?
-
I was looking at your website and found an employee group that caught my eye, can anyone participate?
After the Job Interview:
Thank the interviewer before you leave and send them a short Thank You letter/email later that day. Think about what went well and what you’d do differently next time. Every interview is good practice, even if you don’t get the job.
A thank-you letter can confirm a positive impression of you. Thank you letters show your appreciation and remind the interviewer who you are. By thanking the interviewer, you are helping to build your professional network and you set apart from the other candidates.
Thank You Letter Tips:
-
Choose the appropriate method of delivery:
-
Type the letter if the company is conservative and formal
-
Handwrite the letter if the company is less formal, use a simple quality paper note card
-
Email is acceptable for many employers
-
Texting is too informal and is not an appropriate way to send a thank-you letter
-
-
Use formal salutations and ensure that the interviewer's name and title are correct
-
Express gratitude for the interviewer's time
-
Express your interest in the position
-
Be brief and use a professional tone
-
Send the thank-you letter within 24 hours of your meeting
-
Proofread for misspellings and grammar


Each semester (or quarter), you will likely need books and other course materials. When purchasing books for class, the cost of textbooks can add up. Each class may require at least one textbook (sometimes two or three). According to the College Board, the yearly cost of books and supplies for an in-state full-time undergraduate student at a four-year public college is estimated to be $1,298!
Your classes will have a syllabus available before starting classes; begin searching for the required textbooks in advance. On your first day of classes, your instructor will confirm whether they are mandatory to purchase or recommended class materials. You can choose which books you can afford and what your best options , and may even be interested in acquiring the supplemental materials.
-
Try to shop early.
-
Try to shop online.
-
Check that the ISBN and book edition match your instructor’s book when looking for books online.
How to Save Money on Books!
Used Books
One of the best ways to save money on textbooks in college is to buy used books. You can buy used books from sites like Amazon.com, AbeBooks.com, Thriftbooks.com, Ebay.com, Facebook marketplace, etc. Your college bookstore and local libraries may have used books available as well.
E-Books
E-book versions are becoming more and more popular these days and can cost significantly less. These books can be viewed on eBook readers such as the Kindle, Nook, a computer, etc. If you buy an e-book, make sure you download it onto your computer, not from someone else’s computer, or you may not be able to access it.
Book Rentals
Sometimes you may find that renting a textbook can be a lot cheaper than buying the book. Book renter websites such as Amazon.com, Chegg.com, or CampusBookRentals.com are available. You may also check with your college library or bookstore to see if you can rent the book at a discounted rate or for free! You might also want to talk to your professor ahead of time to see if there is an older version of the textbook that you can use for the class.
Reselling Textbooks
Chances are you are not going to keep all your college textbooks, so you can buy books to resell later in order to save money. You can resell your textbooks on these same websites that you buy them from! Likewise, you can find people trying to sell their used books for the classes you need, Facebook marketplace might be a good place to start looking!
College Library Course Reserves
One of the best places to get free books is at your college or university library. It should have most, if not all, of the required books for your courses. If your professor assigns you to read or study some chapters of a textbook, you can make photocopies of the chapters you need or take pictures. Note that course reserves in the library cannot be checked out (you can’t take them home) or make notes/highlight them, so keep that in mind! Nevertheless, the library is your best option if you’re looking to get physical copies of textbooks for free.


